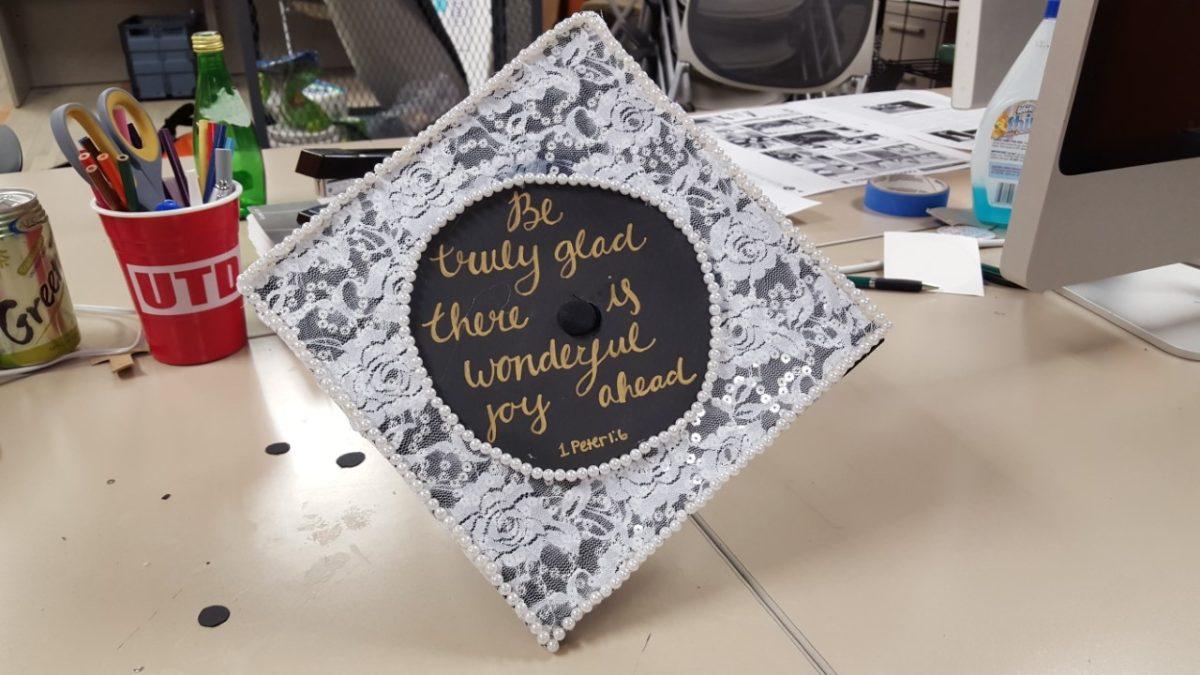
The end of the semester is quickly approaching. All my social media feeds are filled with pictures of banquets and formals, and the countdown to graduation is steadily ticking down. My undergraduate graduation was a bit nontraditional — I finished my classes and defended my honors thesis in June, but I didn’t graduate until August. A couple days later, I moved to Dallas, so my graduation with my Master’s degree has been an experience filled with all the nostalgias and countdowns my last days as an undergraduate would have been filled with — including decorating the mortarboard of my graduation cap.
Surprisingly, there are very few places with instructions about how to decorate your graduation cap, but there is a lot of inspiration online. Many of us have seen the posts of clever and funny graduation caps. In fact, I’m part of a group on Facebook where people post pictures of their decorated graduation caps. As a result of all the inspiration from Pinterest and Facebook, and the fact that I didn’t have the opportunity to do so for my undergraduate graduation, I wanted to try my hand at decorating my Master’s graduation cap for commencement for my last Pin Possible.
What you need
– Graduation cap
– Lace fabric
– Gold metallic sharpie
– Pearls
– Cardstock or scrapbook paper
– Mod podge
– Hot glue
– Super glue
– X-Acto knife
– Scissors
Instructions
1. Cut the cardstock to fit the top of the cap. I had to glue a couple pieces together since the cap is 10 by 10 inches and the card stock was 8.5 by 11 inches.
2. Using an X-Acto knife, cut a hole into the middle of the cardstock where the button that holds the tassle is.
3. Trace the cardstock on to the fabric and measure out approximately an inch on each side and cut.
4. For the window of the lace, use a large circle to trace in the middle of the lace fabric and cut.
5. Paint mod podge all over the side of the cardstock that will be the top of your cap and lay the lace on top.
6. Smooth the lace on top of the cardstock and allow it to dry.
7. Wrap the lace around the edges of the cardstock and again secure with the mod podge. Allow it to dry.
8. Using hot glue, line the pearls around the outer edge of the cardstock.
9. Measure, on another piece of cardstock, a circle that is slightly bigger than the middle of the lace fabric window. Cut it out and cut out a hole for the tassle button.
10. Write the quote on the circle using the metallic sharpie. Be careful about where the quote is being written so that it will line up correctly on the cap.
11. Mod podge the circle onto the lace cardstock with the holes aligned.
12. Line the lace window with pearls.
13. Secure the whole thing onto your graduation cap using super glue. If it’s difficult to put on, try using the X-Acto knife to widen the hole just a little bit.
Obviously, this is just one example of a graduation cap decoration. Instead of pearls, you could use a bright ribbon to line the cap or use scrapbook letter stickers in place of the hand-lettering. There are so many more that involve using rhinestones, paint, stickers, scrapbook paper and even fake flowers. Instead of using lace, you could use a piece of colorful or patterned paper or fabric. And if you dislike your handwriting, you can even use scrapbook stickers or print out the letter and trace them onto the cardstock.
For me, one of the most important aspects of decorating the cap was making sure I did it piece by piece. First I cut the cardstock until it was what I wanted and the hole was cut out appropriately without having too much of a gap and without the cardstock having to be warped and wrinkled to be put on. Then I cut the fabric out and positioned it how I wanted and ensured that the window of the lace was what I wanted. Finally, I wrote the quote on a separate piece of paper instead of writing it in the window left by the lace and just hid the edge with another circle of pearls. This same concept can be applied to other designs such as creating the background for the cap on the cardstock first and then using stickers to write whatever you want on the cap.
For a cap that is completely calligraphy and paint, I would also suggest painting it on a piece of cardstock first and then gluing it onto the cap so that if you accidentally mess up you haven’t ruined your cap.
I’m going to be honest. The entire project was a bit challenging, but I would say that for me, the hardest part was getting the quote written the way that I wanted it, and I’m not 100 percent happy with it how it is. The scrapbook letter stickers would probably be a good way to make this project a lot easier. Also using scrapbook paper as the background rather than a fabric with holes everywhere might help make the project a little easier. Overall it’s very doable, especially for people who have a lot of experience working with paint or hand-lettering, and I can’t wait to wear it for graduation.

