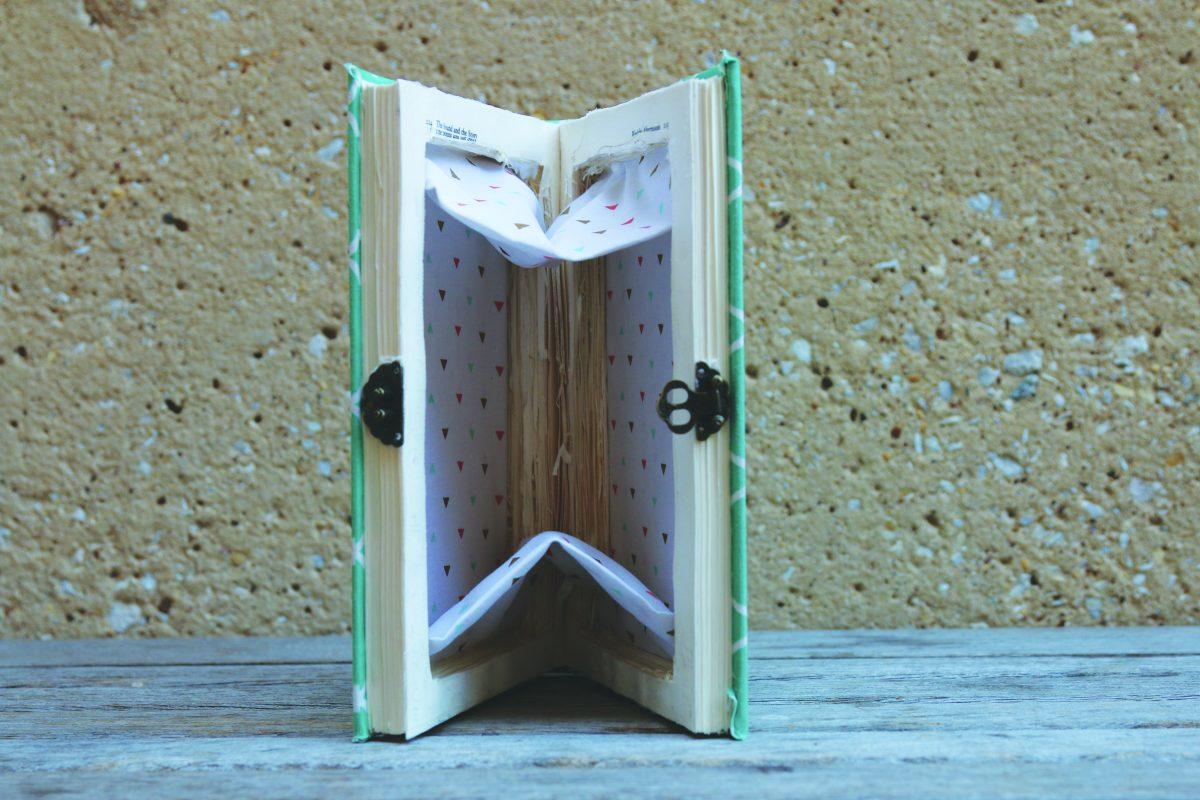
When I was a child, my cousin and I used to pretend to be spies. We would hide notes to each other in books and spend too much money on spy equipment toys. Too many pens that doubled as hiding places and fake spyglasses could be found all over my house. Several years have passed, and I still get excited by puzzle boxes that you have to solve and fake books that double as storage. Scrolling through Pinterest for my next project, I was elated to find this DIY book clutch. It excites the little kid in me that loved to hide things in plain sight, and the bookworm in me that thinks a book is an important accessory. It was definitely a challenge, but I’m glad I had the chance to get pushed out of my comfort zone.
What you need:
- An old, hardcover book
- An X-Acto knife or a utility knife
- Mod Podge
- A brush
- Fabric
- Needle and thread
- Box clasp
- Super glue
- Ruler
- Wax paper or parchment paper
Instructions:
1. Take the cover off of the hardcover book. Trace the outline of the book opened onto the fabric that you want on the outside. Then, using the ruler, mark a 1-inch border around your outline. Cut out the final shape.
2. Brush Mod Podge on the front cover and lay the fabric on it according to your initial trace marks. Smooth out the fabric. Brush more Mod Podge on the spine and back cover and cover the book while it’s opened. The fabric will tighten a little bit when you close the book, but it should still wrap the book completely.
3. Cut the corner squares of the fabric on the outside edges so it doesn’t overlap when you glue the excess around the edges of the book. Then glue the excess over the edges so the book is fully covered.
4. Trace only the front cover of the book on the coordinating fabric and measure 1-inch in from your outline. Cut that out and glue it in the back cover.
5. Let it dry for several hours or overnight.
6. Turn to the first page. Trace out where you want the hole to be in the book and begin cutting out the pages. This will take several hours and can be spread out between several days.
7. After you’ve finished cutting the pages, separate the book in the middle. Place a piece of wax paper or parchment paper in the middle.
8. Count in 10 pages from the front, place a piece of wax paper there and do the same with the last 10 pages.
9. Mod Podge the middle two sections on the outer and inner edges. Use several thin coats and let it dry in between each coat.
10. After it’s dry, open the book as wide as you would like it to go on a piece of paper or paper towel. Trace the shape of the inside sections without the cover. Then, add an inch to both sides and draw the reflection of the trapezoid so you have a diamond-shape minus the bottom and end points.
11. Trace that onto the fabric you want for the inside and cut two versions of it out.
12. Fold the fabric in half so that the off side is on the outside and do a basic running stitch on the top edge. When you are finished, flip the fabric inside out.
13. Using super glue, attach the diagonal edge to the outside of the middle section with the narrow side down. Glue the other edge to the outside of the other middle section. Then follow the same process for the other piece of fabric.
14. Mod Podge the page with the fabric glued onto it to one of the outer pages.
15. Glue the outer most page in the front and back to the front and back covers respectively.
16. Mod Podge the end pages and book covers with their respective middle sections, ensuring that you use wax paper to keep the two sections from sticking together.
17. Let all of this dry overnight.
18. Use super glue to attach the clasp to the book.
19. Let the super glue dry one more time overnight just to be sure that everything sticks.
This was one of the hardest and lengthiest projects I’ve ever done. At one point, I was about to start crying while cutting the pages of the book, and I’m still not satisfied with the end project. I think if I could go back and do it again, I would spread out the project over more time. I covered the book and hollowed out the pages in one night, and it took me about six hours to do. The other parts were spread out over the next two days to give ample drying time for the Mod Podge. It’s a great medium-time commitment project that you can work on little by little for about a week. I wouldn’t suggest trying to finish this in a day.
It’s a cute accessory though, and I think this clutch will become a part of my daily campus outfit because it makes the inner nerd in me so happy. I’ve already gotten a lot of use out of it.


