
During my freshman year of college I bought an infinity ring off of Etsy. It was a very simple, soldered ring. The $30 price tag, however, kept me from buying another one after losing it a year later. Wire jewelry is a cheaper alternative to straight soldering, and can often produce cute pieces of jewelry that look store bought.
With the summer just beginning, I thought making wire jewelry would be a fun June DIY project for those lazy days sitting around the house. After not touching wire jewelry since my freshman year, I decided to dig up this technique again for my latest and longest Pin-Possible.
The simplest project you can do with wire is shaping it into different forms or words. The great thing about wire is that it is very malleable. Most gauges of wire are easily shaped by your hands, which is great for detailing, but can be incredibly frustrating when you’re trying to keep something in a particular shape.
A larger gauge number represents a thinner wire. I like to work with either 18 or 20 gauge wires because they are thin enough to shape with my hands, but thick enough to use for spelling out words and shaping designs.
The simplest way to explain how to shape wire is to find a design and visualize it as one continuous line. Sometimes it’s helpful to draw it out and other times you just have to dive right in.
For the bow ring, I followed a photographic tutorial on Pinterest that involves loosely forming the ring out of wire around whatever finger you want the ring to go on. Then you take the two ends of the wire to make the bow loops and use one of the ends to wrap around the cross-section of the loops and secure the bow in place. Cut off the edges to shorten the bow ends.
Another popular thing to do with wire is to make words. This is where that cursive writing you learned in elementary school comes in handy (do they even teach that anymore?). This requires a little bit more attention to detail in order to get the sizing of the letters all correct, so write out the word in cursive and use the needle-nose pliers and fingers to shape the letters. You can either shape them with two loops at the end to attach chains for a necklace or make a bangle bracelet out of them (more on that below).
My last wire charm involved a little more imagination than the others. I absolutely love photography, and I am kind of a dork about it. I’ve been eyeing this camera necklace for the last several months, but much like the infinity ring, cannot justify the $45 price tag that comes with it, so I decided to get a little creative with my wire crafting and make a camera. It definitely isn’t as cool as the necklace online, but hey, it was fun to make.
With this one, I knew I would have to secure parts of it together such as the circle of the lens with the bottom of the camera body. I used the smaller 26 gauge wire to make it a little less conspicuous. I just wrapped the thinner wire around the two wires of the camera that needed to be secured. My sister thinks it looks more like a suitcase than a necklace, but I have an extreme case of wanderlust anyways, so I guess it works out.
WHAT YOU’LL NEED
– a variety of wire in different gauges and colors (I had 20 gauge bronze, 20 gauge copper, 18 gauge silver and 26 gauge siver)
– wire cutters, flat tip pliers and needle nose pliers (I bought these in a pack at Hobby Lobby)
– beads and charms for your various projects
Another fun project I found using wire are some Alex and Ani-inspired bracelets. For those who have never heard of Alex and Ani, it’s a company that makes adjustable bangle bracelets with charms on them. Their bracelets usually run $25+ for one, but I was able to make three bracelets for a fraction of the cost. 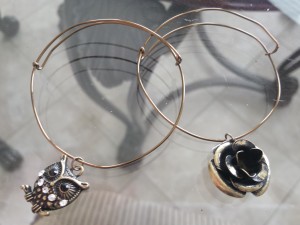
You cut the wire so that it wraps loosely around your wrist with a few more inches on each side. Thread your charm of choice in (I would recommend one with the same kind of metal coloring as your wire). Then you take alittle bit of the end of the wire (probably about an inch) and bend it in a right angle towards the other wire and bend it over the wire and secure it so it doesn’t move. Then do the same thing with the other end. There you have it. I used the 20 gauge, but it ended up being a little too malleable for my taste. If I did it again, I’d probably use a thicker wire (maybe 14 or 16 gauge).
I will caution you, however, I’m not as happy with them as I had hoped I would be. I might just call it a day and shell out the money for a couple of those. I used the 20 gauge bronze wire as well as a set of bronze charms I found for $3 at Hobby Lobby.
The last project I decided to attempt for this Pin Possible was a bird’s nest charm. This is probably my “most plausible to sell for money” project, but it ended up being super easy as well.
I measured out 5 feet of the 20 gauge copper wire. I strung three pearl-like beads about 3 inches down and shaped them in a triangle making sure to leave some space in between the beads, leaving the extra 3 inches of wire alone for later. I then curled the wire to make it a little messier. Then I wrapped the wire around my beads five times.
I secured the loops by threading the wire through each of the spaces in between the beads twice. After that, I worked on building the bottom of the nest using a variety of loops and zig-zags of wire, making sure to secure the loops and wire after every few layers until the bottom looked like a bird’s nest.
Finally I brought the remaining wire up next to the extra piece from the three inches I’d left out and twisted them together. Then I formed a loop cut and off all the excess wire. I couldn’t find a chain with the exact same copper coloring as the wire, but I’m sure it exists somewhere. Otherwise, I’ll use some leather cord and some wire wrapped ends.
This has officially been my longest Pin Possible ever, but I hope it inspires you to create some wire jewelry of your own this summer. What has your experience been with it? Let me know by tagging your posts on social media with #pinpossible or #utdmercury.
Advertisement

Advertisement

Advertisement
